Pages

Showing posts with label tempera paint cakes. Show all posts

Friday, November 16, 2012

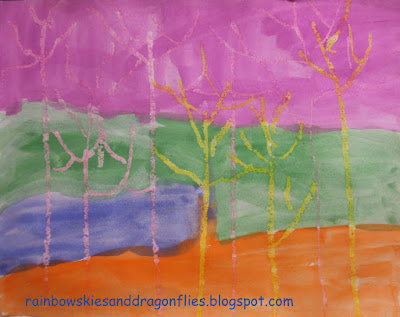
Color Wheel Skies with Birch Trees - 5th Grade


My classes are studying color at the moment.  I had my fifth grades review the color wheel and it's order by creating skies using a grid a basis to paint their colors in.  Every two rows combined two colors that were next to each other on the color wheel.  Red-Orange, Orange-Yellow, Yellow-Green, etc...  I made up a chart with each color combination in order so they could visually see what colors went in what rows.  It really helped!  The chart helped them to see where to place their colors without getting confused.  I let them have a little artistic license with how they painted the rows in as long as they stayed in color wheel order. and stressed that our main objective was to be able to remember what colors were next to each other on the color wheel for future reference if they did not have a color wheel to look at.  I also made up small color wheels that I printed out and laminated so each student had their own to look at. 


the next step was to create some birch trees using a pulled paint technique.  There are a million demos out there for this technique.  The one we used was to take pieces of mat board that I cut up into rectangles that they could easily hold and dip the edge into black paint.  I poured a small amount of black paint into small plastic plates that I covered with tin foil.  When we were done using the black paint for the day I covered the plates with more tin foil to save it for another day.  I also saved the mat board pieces to reuse if they were still decent.  This saved a lot of prep time.  When we were done with the paint for good, I just took off the tin foil, threw it out and saved my plates for another day!  I have been using the same plastic plates since last year by using this technique!

They drew out their trees onto some white drawing paper and pulled the paint along the side of the trees using the mat board rectangles.  I did have the students practice their pulling technique because it needed to be a quick pull so they did not get too much paint on their tree.  We let them dry, then cut them out and glued the trees in place!  They came out really beautiful!  Enjoy! :)


Saturday, October 27, 2012

Shape Abstracts - 1st Grade


My first grades created these shape abstracts back in September.  This lesson focused on shape review, proper painting technique/procedures and following directions.


I instructed them on which shape to draw and how many.  Three circles, three triangles and two squares.  They placed them randomly on their paper, positioning them how ever they wished.


The kids traced their pencil lines in black oil pastel and painted them in with tempera cakes.  Everyone did a great job!  


Here's hoping that Hurricane Sandy does not hit New Jersey in the way they are predicting! Not looking forward to days of no electric again this year for Halloween!  Lost power for four days this time last year in a freak blizzard that took down several the trees in the area!  I was supposed to be attending a workshop on STEM to STEAM on Mon and Tues but it has been postponed due to the impending weather.  Of course I got the notification right after I finished writing and putting together two full days of  lesson plans!!!  Instead of a nasty trick from Mother Nature, I am hoping for a Treat!  Be safe and good luck to all of you in the area!  :)


Friday, October 12, 2012

Color Wheel Pumpkins & Zentangle - 4th Grade


This lesson was inspired by this pin, I found on Pinterest some time ago.  I needed to do a color wheel lesson with my fourth grades but I wanted it to be something that would hold their interest.  Since it is Autumn and Halloween is just around the corner, I decided to go with pumpkins! 

I instructed the students to start by drawing six overlapping pumpkins.  Every time I was asked:  "Why do they have to overlap?"  In return said:  "Think about it."  They knew we were using the color wheel in order to paint them in.  Happily, there were a few students that quickly answered:  "Where the pumpkins/colors overlap we will get the tertiary colors, red-orange, blue-green, etc..."


The first steps looked something like this.  I reminded the students the major objective was to keep there colors in order of the color wheel starting with red.  They outlined their drawing with black Sharpie marker before painting.


If they had more than six pumpkins, they were to go full circle and repeat their colors from red until they were out of pumpkins to paint.  It took one 30 minute class to draw out, trace and paint their pumpkins.  Very few students needed extra painting time the next class.  The students kept asking:  "Can we paint the background?"  Mind you they are used to me always saying:  "Paint everything!"  "No, we are not painting the backgrounds this time."  I didn't know what I wanted to do with the backgrounds at that time.  Something that would give it some pizzazz!  Something that would make you say:  "Wow!"  When you looked at them.  So I thought about it all week.  I wanted a background element that would contrast with the colorful pumpkins.  I came across this pin.

That was my "AH-HAH " moment!  Zentangle the background with black Sharpie!  The black and white designs would be the perfect companion to the colorful, simple lines of the pumpkins!  When the students saw the completed sample they were very excited to start their own designs!  All the classes are doing an excellent job and loving the end results! Here are a few finished and in progress pieces from this week! 


Sunday, October 7, 2012

3rd Grade & Wolf Kahn


I discovered the work of Wolf Kahn this summer while looking around the web.  I must express that I was blown away by the beauty of his pieces!  He was born in Germany in 1927.  He and his family fled from Germany in 1940 and relocated to New York City where he grew up and studied. Wolf makes his home in NYC and Vermont and works primarily in pastels and oil paints.  I introduced him to my third grades on Thursday and they were also blown away by the beauty of his pieces!  We started by looking at many of his pieces on the Morrison Gallery website on the Smartboard.  There were so many pieces to view and the kids wanted to see them all!


This is one of the many pieces by Wolf Kahn that my third grades looked at.


I made up table posters (1 for each table).  These gave the students a close up visual of the artist/artists work that can stay on their table fpr them to study throughout the project.  I laminate them and save them from year to year.  So, when they get paint plastered or accidentally spill colors, I can just wipe them off easitly.


This was a quick artist study/project.  The kids were able to finish in one class period, then they started by creating a simple sketch of trees using oil pastels.  I only gave them purple, light green, white, peach, pink and yellow to draw with.  They could use one or many of the colors to draw their trees.  Some even added leaves to the branches.  I had them paint over the oil pastel using the tempera paint cakes that I had already out and prepped from the color studies we are doing in fourth and fifth grade.  The colors are bright and the kids were able to water them down for a more transparent look if they wanted to.  Here are some of the finished pieces from Thursday...


As we were cleaning up after class, one of my third grade boys while looking at the images on the table poster said:  "I just can't believe it."   I replied:  "What can't you believe?"   "I can't believe he is still alive!"  The kids always imagine every artist as deceased!  I went on to say that not all artists we talk about are deceased.  Many are alive and well!  He went on to say:  "Wow! He looks really good for a man in his 80's!"  This is why I love teaching elementary age children!   :)

Friday, October 5, 2012

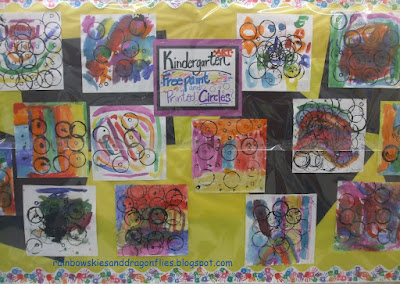
Kindergarten - Free Paint and Printed Circles !!!


Well, I survived my 400+ progress report grades from last weekend so here I am with some awesome (I think) art created by my Kindergarten's!  Let me just say:  "I LOVE MY KINDER'S!!!"  I have been having the best time with my Kindergarten's!  I'm exhausted, but so in love with working with this group of students!  They have come such a long way since that first art class when I was scrambling to get names on papers and prepping numerous activities to keep them all busy for the full 40 minutes.  They are all writing their own names (yes, I still have to do a bit of deciphering, some of the names resemble a code by Da Vinci!)

Now they are all coming in, sitting down and ready to start creating!  Two weeks ago I painted with them for the first time.  The Kindergarten teachers said all week the students  kept asking when Art was because I had said we were going to paint!  I used the tempera paint cakes I had purchased with my Artsonia money.


I started the lesson with how to get prepped to paint in the art room...  Once they got their paper and put their name on it, I called the students by tables to walk over and get their smock from the back of the bathroom door.


I physically walked over and showed them how to get their smock off the door and then walk away so other students could get in for their own smock.  I used one of the students as a model to show them how to put it on and we were ready to paint!  I demonstrated how to use the paint brushes and paints correctly and how to wash out their brushes between colors so they didn't get all mixed up.  (Note to self: get smaller smocks for Kinders next year!  They are being swallowed alive by the smocks I currently use!)  We're working with them though! 


I passed out the painting place mats and had the kids spread them out on the tables.  I passed out the paints, water and brushes as they eagerly dove into the paints and began to paint their papers how ever they wanted.  The only rule was that they needed to cover the whole paper the best they could.


When they were finished painting, I showed them how to put their own paintings on the drying racks before they cleaned up.  Washing their hands is a little hard for a lot of them as they are too short to reach my soap dispenser and the faucet to turn on the water!  My room was not designed for the shortest members of our building!  I have been dispensing soap into one of the water buckets and letting them dip their hands in to get them soaped up!

During the second class the kids stamped circles onto their paintings using black tempera, plastic cups and old marker caps.  At clean up we had another refresher course in Hand Washing 101!  They like to soap up and immediately rinse it off before it can do any good!  They also just hold their hands under the water with out rubbing them together.  I went through the whole procedure for being "Scrub-A-Dub" clean after painting.  They thought it was quite funny how I gave the directions in a Sing-Song way!  I did however hear several of them sing the same directions to themselves as they were scrubbing hands!  Here are some of the painting/printmaking results...


You can see that some of them were still wet when took the photos!  I hung some of them up on the bulletin board in the school's front hallway...


I put the pieces up late after school and a meeting on Monday afternoon so the display was up for a day with out the sign stating that it was the work of Kindergarten.  The day I hung the sign everyone kept exclaiming that they couldn't believe the Kinders made them!  They thought it was 1st or 2nd grade!  I think they did a really great job and I'm so proud of them! They are so proud of themselves!  These are some close-ups from the bulletin board display...


The reflections are from the laminating film I use to cover the art work so it is not destroyed at bus time by the bus lines.


I hope everyone has a great weekend and a chance to re-charge so we can do it all again next week!  :)