Pages

Showing posts with label Eco-Printing. Show all posts

Wednesday, August 13, 2014

Rose Leaves and Doodling...


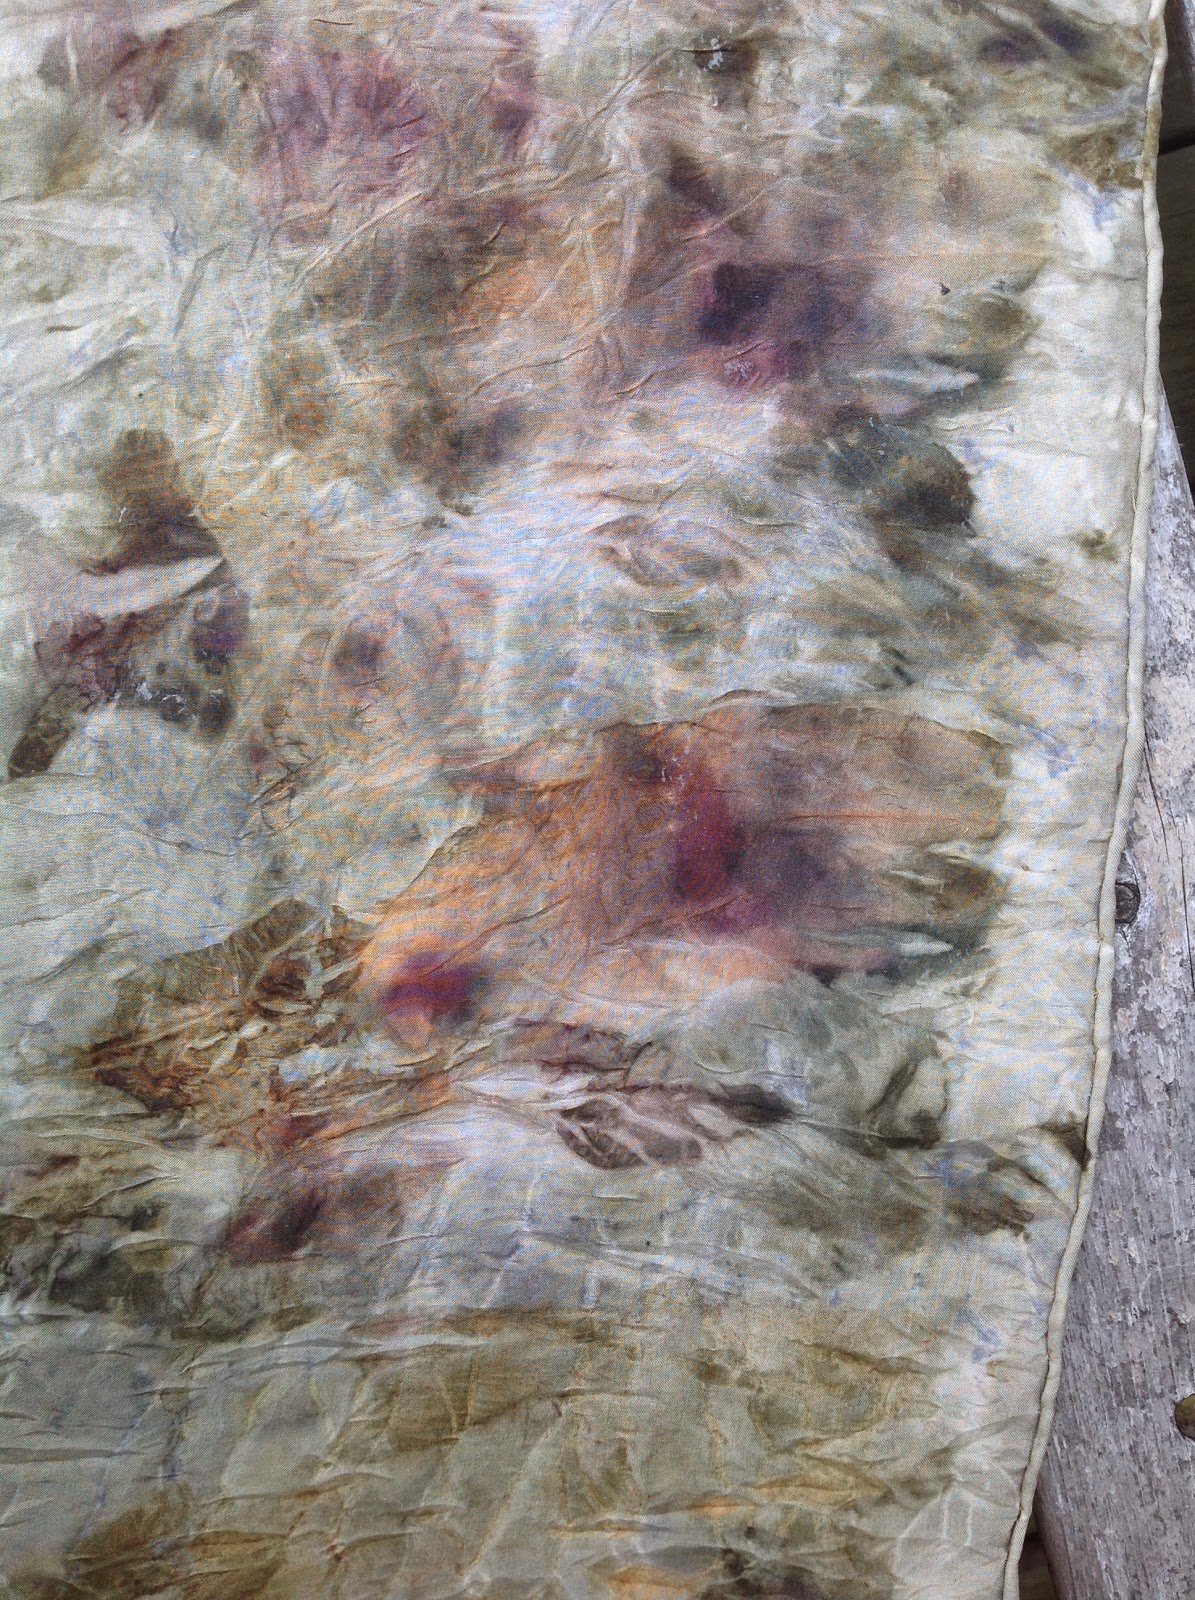
Rose leaves... eco-printed on silk, some were from wild roses growing in the woods by my house and some from shrub roses I planted years ago along my driveway...  since one had a strong, glossy leaf and the other a soft, almost fuzzy leaf i was curious to see if they printed different but they didn't, both printed the same.  


I over printed two scarves from my last eco-printing that didn't print well. They had some color but no prints.  The scarves had been in an iron mordant previously so I didn't re-mordant.


After boiling the two scarves for about an hour in a double boiler I added a little bit of water from the iron mordant bath...  the outside color of the bundles went instantly from green to gray!  Chemical reactions... I failed Chemistry in high school so I can't tell you why it happened just that it did... so cool! I let them boil gently for another hour...


I covered the leaves with plastic wrap this time so that there was no double printing through the layers ( I checked my box of plastic wrap it said microwave safe so I figured I could boil it as well... I kept checking it as it boiled and it was perfectly fine...) I also made a core to wrap the scarves tightly so that the leaves got the best surface contact with the scarves. I rolled up some heavy cardboard and covered it really, really well with plastic wrap. I did poke a small hole in each end of the roll because as it was boiling it started to puff up from steam! 


I only let them cool for a few minutes when they were done because I couldn't wait to open them up! 


Since the two scarves are short I am going to sew the two of them together to make one larger scarf!  So happy with the results!!!  I ordered some more scarves from Dharma Trading.  I am very happy with the quality and they shipped my order very quickly. This time I ordered some bigger scarves ( I got small, inexpensive ones first to practice) and one that is a silk/wool blend. Wool is also supposed to be very good for eco-printing.  Now I am going on the hunt for fresh eucalyptus at the florist...  


I spent some time roaming around my local Michael's yesterday afternoon. I had dropped my daughter and a friend at the mall to shop so I took this opportunity to walk around and browse without a teenager whining, "I'm bored"  "Are you done yet?"  behind me!  I found this desk organizer on the cheap and decided that I was going to re-design it with the same "cover it with white contact paper" technique I used on my notebooks from my last post. ( inspiration from Alisa Burke )


I bought two since I have two desks ( two schools) I picked two that had lighter colored backgrounds because the patterns show through the contact paper slightly, the lighter the background the better. 


Once you start doodling though it doesn't show anymore...


...the opposite side...  


I also picked up these mammoth clothes pins, six of them, three for each school. I also got some heavy duty magnets. I'm going to doodle the clothes pins and attach the magnets. I'm going to use them by my desk to hold memo's, duty schedules, etc...  so fun! 


Two notebooks done...  I was able to doodle one of the desk organizers while watching "Shark Week" last night.  I will probably work on the other tonight...  

:)  :)  :)  

Monday, August 11, 2014

Eco-Printing Beauty!!!


Success!!!
I finally have some successful eco-prints and I am over the moon with how they came out!  :)


1.  Rose leaves on silk with iron mordant. Boiled for 1 1/2 hrs - some iron in the water also...


                   2.  This one is...


                            ...yellow and red onion skins on silk with an iron mordant...


3.  Geranium leaves, geranium flowers and marigold flowers - silk with iron mordant...


             The geranium leaves/flowers turned purple from the iron, the marigolds turned green...


           4.  This last one is rose leaves and Goldenrod flowers...


             Anything yellow turns green with the iron mordant/water bath... rose leaves were
   variations of purple, gray and green in the pieces....


:) :)  So happy  :) :) 

These two scarves had red maple leaves on them and did the leaves did not print, but they did leave a few markings from the stems and leaf veins. The leaves died a faint pink color on the silk...  


I'm re-printing these this afternoon with some three different types of rose leaves. Should be interesting...
*** UPDATE:  I eco-printed these two scarves again this afternoon with just rose leaves and I used plastic wrap to separate the layers so I got one solid print of each leaf cluster, not many of the same thing. Freaking awesome results!!! It is the exact result I have been working for! I will post the pictures in the next couple of days! They are hands down my absolute favorites!!! :) :) :)  ***


These are my tools, an old stainless steel pot with a strainer insert... I never cooked with it so it became the dying pot! Once you start dying in/with a utensil don't use it for food anymore.


disposable metal buffet trays are where I dye and mordant the fabrics... this is leftover iron mordant, I've re-used it a couple of times.  I'm going to wet the two scarves I am re-printing in it later.
If any of this process interests you, these are some sites I have used to research how to go about eco-printing:

They have all been invaluable in some way or another while I have been researching this process.


Sunday I picked up several cheap composition books at the market. I covered the front of them in white contact paper and spent the afternoon doodling all over them with a black Sharpie...
inspiration from, Alisa Burke, seriously, this woman is amazing! The contact paper idea came from something she did with her dishwasher, check out her July post called doodled dishwasher.  
I'll use these for school lesson notes, school/home project idea notes, etc...


I'm putting the edging on a shawl I started last week... it's from a graph I found on-line in Russian or something like that ( can't read it...)  after working on it for a little while I starting thinking there was something very familiar about the pattern... it came to me after I screwed up a couple of rows and had to rip them out, it felt like deja-vu...  then it hit me! It's the same pattern as the South Bay Shawlette! The only difference is the main stitch is a Treble crochet instead of a double crochet! I knew that screw up seemed familiar! Funny how I didn't realize it until I messed up the pattern! I make the same silly mistake every time I make a South Bay! I go on auto-pilot and mess up the repeats all the time with that one! I never realize it until the next row when things are out of wack!  

Well, that's all I've got for today! I'm going to go gather my rose leaves in the garden so I can re-print those two scarves! 
Have a good week all!  :)


Tuesday, July 22, 2014

Flower Prints


I am playing around with Eco-Dying/Printmaking techniques this week! The watercolory prints above are actually from real flowers right out of the pots on my deck/porch! 
One of the techniques that India Flint describes in her book, Eco Colour-Botanical Dyes for Beautiful Textiles, is one she has named, " Hapa-Zome" which is japanese for " leaf-dye ".


Simply, you choose some blooms and see what happens! 
I used 100% cotton muslin but this would work just as well on paper...
I grabbed a couple of test pieces of fabric, two ziploc bags, a small tack hammer and a handful of assorted flowers and leaves...

1. You put the larger ziploc or piece of plastic wrap under the fabric. ( this way the color stays in the fabric better, I used paper towel to start and a lot of color was being absorbed by the paper towel)

2. Place your piece of fabric/paper on top, laying it out flat. 
                                                       
3. Pick a flower that you want to print, lay it on top of the fabric/paper.
                                       
4. Place the second ziploc bag ( a smaller one) over top of the flower/leaf you are going to print. ( plastic wrap will not work for this as you are going to beating the flower with the hammer gently and the wrap will rip)

5. Using your tack hammer/rubber mallet gently beat all over the flower/leaf. The color from the flower/leaf will print into the fabric! 

Now, India Flint recommends doing this gently, as not to beat the flower/leaf into the fabric but, through much experimenting I found that it was difficult not to have smushed flowers in your fabric! The pieces that were not easily removed I let dry and I could very easily rub them off.
Some flowers/leaves worked better than others so it was important to practice different ones first!
Darker colors print the best, blues, purples, oranges... petunias, marigolds, geraniums and begonias printed really well. 
Some flowers I thought would look great either didn't really print or instead of the flower color I got brown!   


                                These are geranium flowers ( two colors ) and begonia leaves.                           


As the prints dried the colors continued to spread resulting in a watercolor effect... 


                  I started this one but my daughter finished it up choosing and printing the flowers...
begonia leaves, geranium flowers, begonia flowers and marigolds...     


This was my first test the other day, I quilted it after it was dry...
              The purple African Daisies turned brownish after the color dried... the rest is marigold, petunia, begonia and a coleus leaf.  I'm taking some of the stitching out of the leaf because it is lost in the marigolds and daisy.


Once the pieces dried I heat set the colors with an iron... curious to see how the color stays...
Since it is natural color it will fade over time ( how much time remains to be seen...) and if left in the sun or washed harshly...  supposed to leave color to set for a long time before hand washing gently if it's a piece of clothing. 

Still working on Eco-Print experiments... prints getting better... waiting for a couple of supplies I ordered... hopefully they are the ticket to the prints I am trying to achieve! :)